Connecting FileMaker Pro and MySQL Database with MySQL ODBC driver
 FileMaker Pro is compatible with MySQL databases which makes it possible to merge the system with any other web platform based on PHP/SQL including Word Press?
As the matter of fact, there is a long-lasting partnership between FileMaker Pro and MySQL (Oracle). There are a few extensive tutorials related to this that come with the software, or could be found on: http://www.filemaker.com/support/product/documentation.html.
However, there are a few things you might have to face that nobody is telling you about when it comes to a real-life situation, and connecting to the WordPress particularily. This article will describe my experience of connecting FileMaker Pro database to MySQL database driving a WordPress website via a MySQL ODBC driver. My goal was to automatically harvest and sort-order data from contact forms so it could be used inside the FileMaker Pro database instantly. I will also include a step by step instruction on how to connect successfully and further integrate it all into a workable system.
Step by Step Instruction
[jbox]My examples will be referring to Windows platforms, if you are using any other platform, try to figure it out or contact me to try to find the correct solution if all the other options fail.[/jbox]Step 1: Open your MySQL database for outside connections
Make sure that MySQL database running your website is OPENED for outside connections. Depending on the web host you either choose this option when installing the database (Go Daddy), switch to it after the installation (Dream host) or call the support to open the database for you. It comes with a security risk, so you want to make sure that your username and password for this database is complicated enough. With some hosts you could also restrict possible connections by the IP address, in case you plan to approach it always from the same place (for this option you also need to have a static IP address, you can usually get it from your internet provider for an extra charge).
You will need to know the following before you proceed, and this can be found on your web hosting control panel(GoDaddy, Dreamhost), under the MySQL database section (if not ask your web-hosts support, or consider changing the hosting plan and provider if they can not provide these details) :
- The TCP/IP address of the database – this is sometimes called “Host Name”,usually the host url address on which the database could be found, NOT THE PHPMYADMIN URL.
- Username – THE ADMIN USERNAME FOR THE MySQL DATABASE, NOT YOUR WORDPRESS USERNAME.
- Password – the ADMIN PASSWORD used to enter the database (again NOT your WordPress password, if they are not similar).
Step 2: How to install the correct ODBC driver?
– The ODBC (Open Database Connectivity) driver, in a few words, allows you to access other databases from your operating system. It is described as independent of database systems and operating systems, but this doesn’t mean that any driver would serve any database on any given system (the description just points to the fact that it is a programming interface that is separate from both the OS on which it is installed and the databases that it is connected to). Here i will be talking about MySQL ODBC 5.1 driver installed on Windows7 Ultimate OS, and the problems i had to face to make it work. If you install and configure this driver successfully you should be able to operate and manage your external MySQL database tables from FileMaker Pro, just like any other FileMaker Pro table. You would be able to search, make reports, calculations and summaries, lists, sort the records, create graphs, export to Excel, as said anything that you do with regular tables and records you would be able to do with SQL tables and records, except deleting the tables and changing their options (which would obviously have to be defined inside the MySQL database).
WHERE AND FROM WHERE TO DOWNLOAD MYSQL ODBC DRIVER, AND WHICH DRIVER TO INSTALL?
You have to download and install the MySQL ODBC driver on the computer where your FileMaker Pro database is hosted. If hosted on the server you will need to install ODBC driver on the server machine and compatible with the servers OS. At the time i am writing this (1st May 2012) the driver is called MySQL ODBC 5.1 driver or Connector/ODBCand you can find it on MySQL website and download it for free, here is the link (if the link is not working at the time you are reading this, look for the driver at www.mysql.com under the name “Connector/ODBC 5.1.11”):
http://dev.mysql.com/downloads/connector/odbc/
This link should take you to the download page where you will face a couple of options and it is very important to choose the right ones:
- Choose the platform on which the driver would be installed (Linux, Mac, Windows, Sun Solaris etc…)
- Would you need a 32 bit or a 64 bit version driver
- Would you like to download a ZIP archive or an installer.
Common sense would tell you to download and install the designated driver according to your operating system, and here is where things can go wrong.
If you are installing a MySQL ODBC on a Windows 32 bit systems you will be ok to download the designated driver, “Windows (x86, 32-bit), MSI Installer”, and proceed with the instructions provided further.
However, if you have a 64 bit operating system, which usually comes with a more modern equipment, and specially a 64 bit server OS, which is most likely to be the case, you will face a problem.
In that case, please read the article:“How to Install and Configure a 32bit ODBC driver on a 64 bit Operating System” and then proceed with this article.
Step 3: How to configure MySQL ODBC driver and connect to MySQL database?
Now when you have the database opened for connections and a 32 bitMySQL ODBC driver ready to manage this connection and connect it further to FileMaker Pro, the next step is to configure the driver to connect to MySQL database. This is done in a few steps.
If you are using a 32 bit operating system go to:Start\Control Panel\Administrative Tools\ and double-click on the shortcut that reads “Data Sources (ODBC)”. IF everything worked fine up to now, the drivers name – MySQL ODBC 5.1 , should appear on the list under the tab “Drivers” . If it is not there you need to install the driver again or make sure that you are using the 32 bit operating system.
Path to Data Sources admin tool where you configure MySQL ODBC driver on 32 bit Operating Systems: 1) Start ; 2) Control Panel; 3) Administrative Tools; 4) Data Sources (ODBC); 5) Drivers – MySQL ODBC 5.1
If you are using a 64 bit OS you need to follow a diferent path (as mentioned above):C:\Windows\SysWOW64\odbcad32.exe:
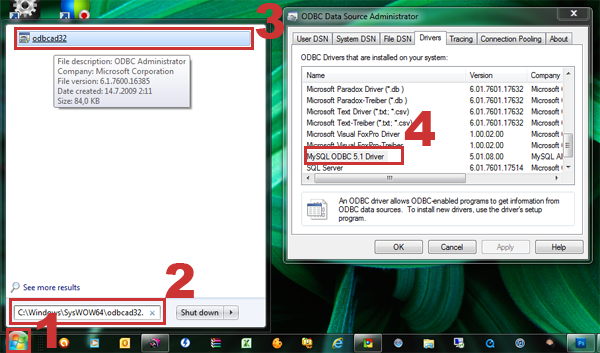
Path to Data Sources admin tool where you configure 32 bit MySQL ODBC driver on 64 bit Ope rating Systems: 1) Start; 2) Search for:C:WindowsSysWOW64odbcad32.exe; 3) Double-click: odbcad32.exe; 4) Drivers – MySQL ODBC 5.1
Once you know that the driver is there, in the “Data Source Administrator” (the last opened window) switch to tab “User DSN”, then press the button on the right which reads “Add” and the new window will open, named “Create New Data Source”, offering you to choose the driver from the list. Choose MySQL ODBC 5.1 Driver and click “Finish”.
![]()
![]()
How to configure MySQL ODBC driver: 1) User DSN; 2) Add; 3) Choose MySQL ODBC from the list; 4) Finish
Finally, the new window will open, named “MySQL Connector/ODBC Data Source Configuration”, with the following fields to fill:

The dialog window to set up a ODBC connection to the MySQL database
- Data Source Name:could be any name that will be your best reference to this connection
- Description:again, anything of your choice to describe the connection (this is important if you have a lot of databases connected, if you need to connect only to one website and one database it is obviously not that important)
- TCP/IP Server:This is your MySQL database domain name or IP direction. You have to get this from your web host as it varies from host to host. On Dream Host it is usually “mysql.yourdomainname.com” but on other places it may be different, so ask your host or find it in your hosting control panel.
- Port:live as default, whatever you find there, usually it is 3306
- Named Pipe:DON’T TICK (I have no idea what this is for, so better ask, maybe it has some use of which I am not aware)
- User:Your MySQL database username, has to be an administrators username. THIS IS NOT YOUR WORDPRESS Username, but the username you appointed when installing the database
- Password:The MySQL DATABASE admin password
- Database:The name of your database, again this is the name you given when installing the database, you can consult your webhost in regards to this or find it inside your webhosting cpanel.
DONE, you may press “Test”, if everything is OK it should pop up with a message “Connection successful”.
Now you should go to the “System DSN” tab in the same “Data Source Administrator” window and do the same thing, in case (or if) you intend to use the computer as a server. It is better to have the same data source available for system users in case more clients would need to use this connection and connect remotely.
Step 5: Configering FileMaker Pro to work with ODBC data source
Ok, the ODBC driver is finally installed and connected to the designated data source (which is MySQL database running your WordPress website in this case), we can move on to FileMaker Pro. You need to open the application and open the the file that you would like to connect to your website. After this is done, you should continue as follows:
- Go to File\Sharing\ODBC/JDBCand turn the ODBC/JDBC Sharing ON
- Go to File\Manage\Security\Privilege Sets– pick one (or one by one) set, press Edit go to the box in the down left corner which lists the Extended privileges and make sure that the box beside the one named ” Access via ODBC/JDBC (fmxdbc)” is TICKED
- Go to File\Manage\External Data Sources
- The dialog window opens named “Manage External Data Sources”. Press button “New”at the bottom right.
- The dialog window named “Edit Data Source”appears asking you to appoint the: Name of the source (this is optional, your choice, whatever) and the Type of the source – you need to tick “ODBC” (when you do that the dialog window will change with some new options).
![]()
![]()
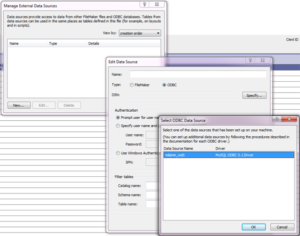
Dialog window that allows you to select ODBC data source from the available ones.
- DSN:Press the button “Specify” – in the list with data source names that appears you will probably find only the one we created in previous steps with a data source name that you made. Click on it to select and then OK in the bottom right. If your database source does not appear on this list, something went wrong with previous steps, or might be that your Firewall is blocking xDBC connections. This will probably not happen by default, so if you installed the 32bit MySQL ODBC 5.1 driver and configured the connection as instructed previously, you should see this connection on the list.
- In the“Edit Data Source” window further down you need to choose the Authentication method. I usually choose “Specify user name and password (applies to all users)”, otherwise the prompt window will pop up all the time. If you really need to hide this database from other users, there are plenty security options inside FileMaker Pro, you don’t have to have this annoying pop up as well.
- In the Specify user name and Password… option type the user name and the password that you use to enter the MySQL database (again NOT the Word Press admin username and password unless it is similar to the MySQL database password, which is not the best idea).
- Press OK– now you should have a new ODBC connection listed in “Manage External Data Sources” dialog window
HUH, THE HARD WORK DONE, NOW YOU CAN PERFORM MAGIC
Step 6: Managing your website database tables and content inside FileMaker Pro
Once you are connected to your MySQL database you can see and import the tables and fields from and use them in which ever way seams convenient to you or your company. You should be familiar with how to import and use the tables from your MySQL database, however, i will just go quickly over this, maybe point to some not so obvious issues, and perhaps confirm what you already know:
- Open the FileMaker Pro file and go to File\Manage\Database (Ctrl+Shift+D)
- Go to tab “Relationships” and then press the icon button in the bottom left corner (1), a little square with a plus to add a table into the graph.
Opening MySQL tables in FileMaker Pro: 1) Tables/Relationships 2) Choose a table
- The dialog window will appear asking you to choose the data source and the tables. You will choose the ODBC data source you created and you will see underneath all the tables from your Word Press MySQL database (2).
When you import them into a graph, the tables will also appear under the “Tables” and the “Fields” tab. Also notice that the new layout will be created for each table you import, just like if you would create the table in FileMaker Pro. From there on you could manage this data much in the same way you do with FileMaker Pro data EXCEPT that you CAN NOT change the type of the fields as this is obviously defined in the MySQL table. If you delete the field or the table in FileMaker Pro, it will NOT be deleted in MySQL database. Basically, they are represented as shadow fields inside the graph, you can create relationships with FM Pro tables and change and create the records and content normally. You could play around for a while and see for your self what could and could not be done, it is quite amazing.
